HexMaster Code
Last week I released my first project, a very simple color quiz game.
In this post I want to show you how I made it.
What I used
Initially I created this project from scratch on a blank webpage, but then I decided to integrate it inside my site, so I convert some of the css and html code to work with Bootstrap(I use it on this site).
I made this chage as I think it looks better.
HTML
The first thing I did was loading the style:
1
|
<link rel="stylesheet" href="/css/HexMasterStyle.css">
|
Then I created the big banner:
 1
 2
 3
 4
 5
 6
 7
 8
 9
10
11
12
13
|
<section id="header" class="jumbotron jumbotron-fluid text-center">
    <div class="container d-flex justify-content-center">
        <div class="row">
            <div class="col">
                <h1 class="display-4 mt-5">Can you recreate this color?
                    <br>
                    HEX:
                    <span id="rndColor">#FFAA66</span>
                </h1>
            </div>
        </div>
      </div>
</section>
|
The id of the span will let me to edit its content via javascript.
After that I create 3 Bootstrap row.
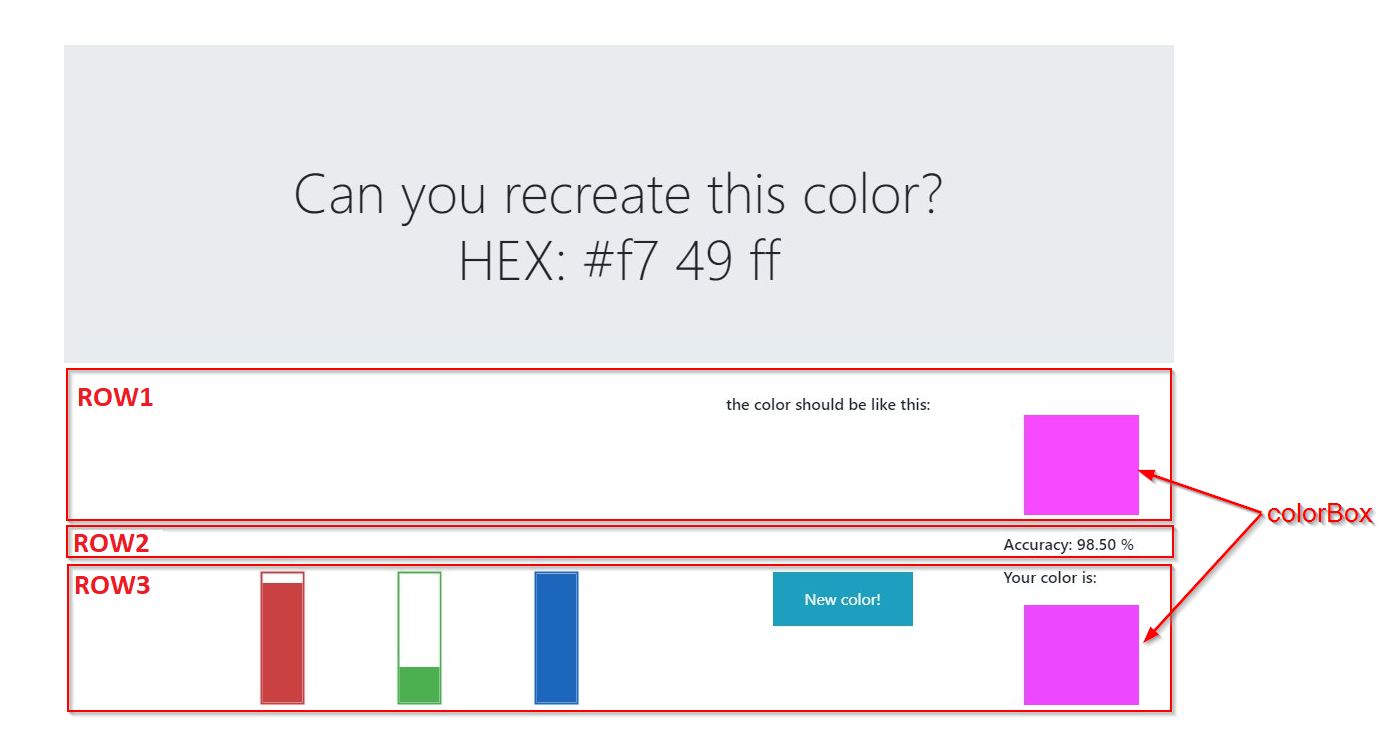
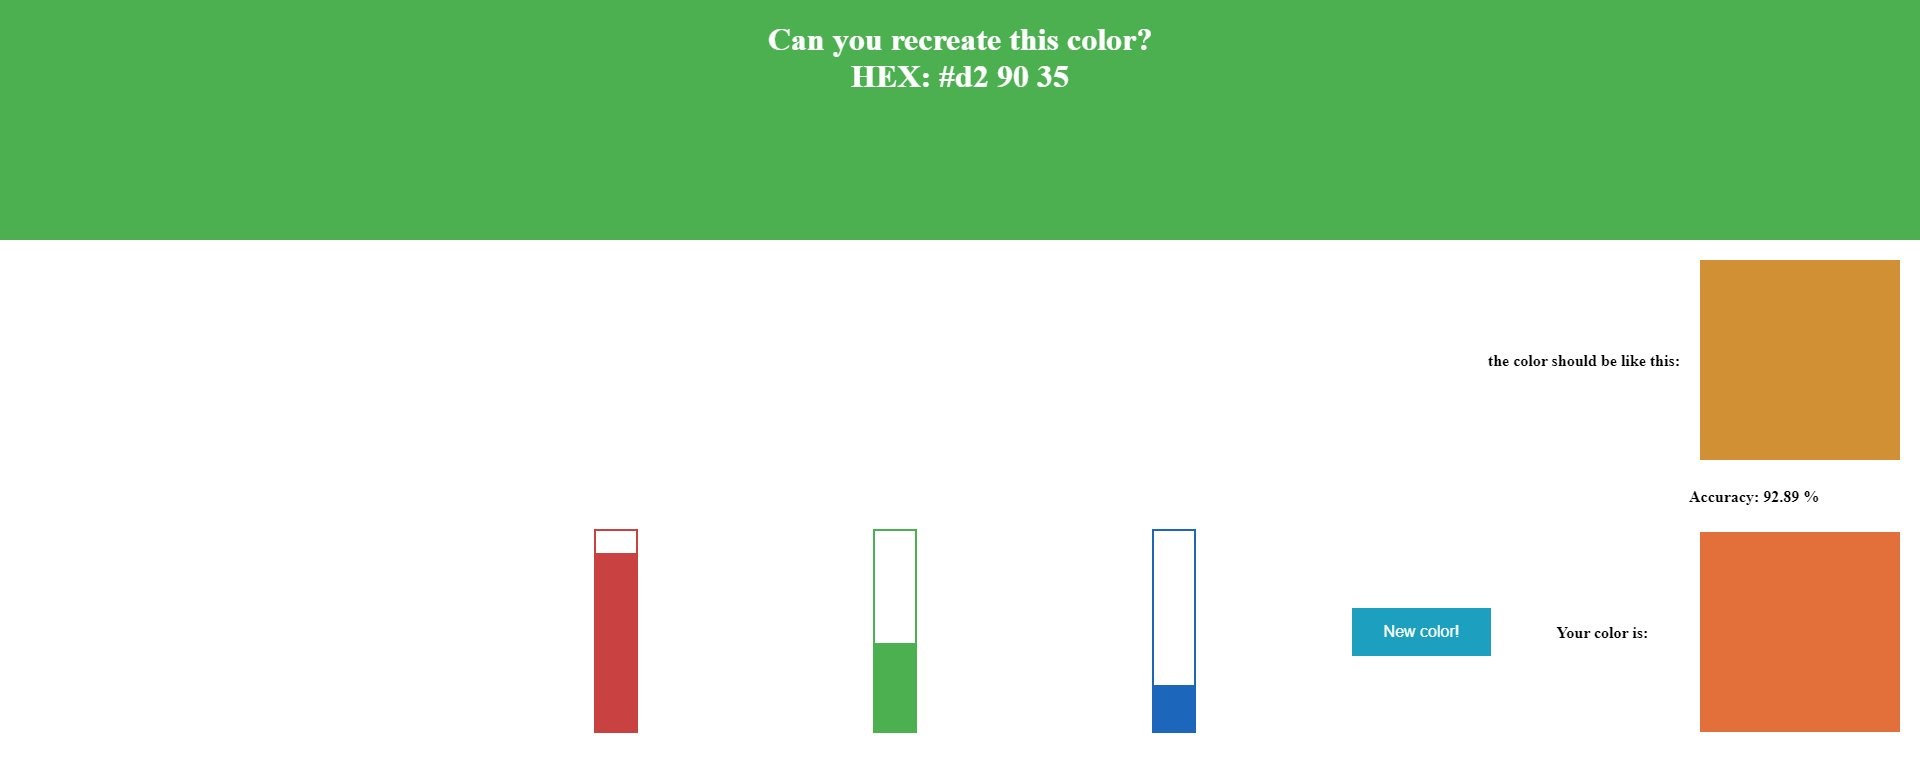
The first row is pretty simple, just some text and a colorBox to show the correct color.
1
2
3
4
5
6
7
8
|
<div class="row justify-content-end">
        <div class="col-sm-3">
            <p>the color should be like this:</p>
        </div>
        <div class="col-sm-2">
            <div class="colorBox"></div>
        </div>
    </div>
|
The second row is even simpler as it only show the accuracy of your’s selected color:
1
2
3
4
5
|
<div class="row justify-content-end">
        <div class="col-sm-2">
            <p style="margin: auto 7% auto auto;" id="accText"><p>
        </div>
    </div>
|
The third row is a little more complex, as it store the 3 bars, the button and the selected color:
 1
 2
 3
 4
 5
 6
 7
 8
 9
10
11
12
13
14
15
16
17
18
19
20
21
|
<div class="row justify-content-md-end">
        <div class="col-sm-6 mt-5">
            <span class="bar">
                <input type="range" id="redSlider" value="25">
            </span>
            <span class="bar">
                <input type="range" id="greenSlider" value="25">
            </span>
            <span class="bar">
                <input type="range" id="blueSlider" value="25">
            </span>
        </div>
        <div class="col-sm-2">
            <input type="button" id="doneBtn" value="Done!" style="display: block;">
            <input type="button" id="resetBtn" value="New color!" style="display: none;">
        </div>
        <div class="col-sm-2 ml-5">
            <p>Your color is: </p>
            <div class="colorBox"></div>
        </div>
    </div>
|
CSS
The CSS is a little tricky as I want to have the range input to be vertically(if the screen width is more than 1000px), then I customized them to be the red, green and blue bars.
Searching on internet i found this very userful for this project.
The base style of the range inputs is:
 1
 2
 3
 4
 5
 6
 7
 8
 9
10
11
12
13
14
15
16
17
18
19
20
21
22
23
24
25
26
27
28
29
30
31
32
33
34
35
36
37
|
input[type="range"] {
    -webkit-appearance: none;
    overflow: hidden;
    cursor: pointer;
    border-radius: 0; /* iOS */
    border: 2px solid dodgerblue;
    transform: rotate(-90deg);
}

@media only screen and (max-width: 1000px) {
    input[type="range"] {
        transform: rotate(0deg);
        width: 200px;
    }
}

::-webkit-slider-runnable-track {
    background: #ffffff;
}

::-webkit-slider-thumb {
    -webkit-appearance: none;
    width: 0px;
    height: 40px;
    background: dodgerblue;
}

::-moz-range-track {
    height: 40px;
    background: #ffffff;
}

::-moz-range-thumb {
    background: #fff;
    height: 40px;
    width: 0px;
}
|
To create the bars I styled the range input like this:
 1
 2
 3
 4
 5
 6
 7
 8
 9
10
11
12
13
14
15
16
17
18
19
20
21
22
23
24
25
26
27
28
29
30
31
32
33
34
35
36
37
|
/* red slider */
#redSlider {
    border: 2px solid #ca4141;
}

#redSlider::-webkit-slider-thumb {
    box-shadow: -100vw 0 0 100vw #ca4141;
}
#redSlider::-moz-range-thumb {
    box-shadow: -100vw 0 0 100vw #ca4141;
}
/* green slider */
#greenSlider {
    border: 2px solid #4CAF50;
}

#greenSlider::-webkit-slider-thumb {
    box-shadow: -100vw 0 0 100vw #4CAF50;
}
#greenSlider::-moz-range-thumb {
    box-shadow: -100vw 0 0 100vw #4CAF50;
}
/* blue slider */
#blueSlider {
    border: 2px solid #1c66bb;
}

#blueSlider::-webkit-slider-thumb {
    box-shadow: -100vw 0 0 100vw #1c66bb;
}
#blueSlider::-moz-range-thumb {
    box-shadow: -100vw 0 0 100vw #1c66bb;
}

.bar {
    width:15%;
}
|
Then I create the style for the colorBox and the button(s):
 1
 2
 3
 4
 5
 6
 7
 8
 9
10
11
12
13
14
15
16
17
18
19
20
21
22
23
24
25
26
27
28
29
30
31
32
33
34
35
36
37
38
|
.colorBox {
    height: 100px;
    margin: 20px;
    -webkit-transition: all 0.3s;
    -moz-transition: all 0.3s;
    transition: all 0.3s;
}

p {
    line-height: 1.1;
    font-weight: 600;
}

#doneBtn {
    background-color: #4CAF50;
    border: none;
    color: white;
    padding: 15px 32px;
    text-align: center;
    text-decoration: none;
    display: inline-block;
    font-size: 16px;
    margin: 4px 2px;
    cursor: pointer;
}

#resetBtn {
    background-color: rgb(29, 159, 192);
    border: none;
    color: white;
    padding: 15px 32px;
    text-align: center;
    text-decoration: none;
    display: inline-block;
    font-size: 16px;
    margin: 4px 2px;
    cursor: pointer;
}
|
JavaScript
This is the most interesting part of the project, and I had a lot of fun making it.
In the first part I just set all the variable, and I called 2 function, genColor and updateText:
1
2
3
4
5
6
7
8
|
var quiz_color;
var user_color;
var accuracy;
var done_btn = document.querySelector("#doneBtn");
var reset_btn = document.querySelector("#resetBtn");

genColor();
updateText(false);
|
With the function genColor I can create a random color, I first create a random number for each channel(r,g,b) then I assign these 3 value to the quiz_color array.
1
2
3
4
5
6
|
function genColor() {
    var r = Math.floor(Math.random() * 256);
    var g = Math.floor(Math.random() * 256);
    var b = Math.floor(Math.random() * 256);
    quiz_color = [r, g, b];
}
|
With the updateText function I take each channel of the “quiz_color” array and, as it is written in decimal base, I convert it to hexadecimal base. Then I update the shown text of the HTML element that have the “rndColor” id.
I used a bool to know if it must show or not the correct color, this only happen when the player click the Done button.
1
2
3
4
5
6
7
|
function updateText(show){
    new_text = "#" + quiz_color[0].toString(16) + " " + quiz_color[1].toString(16) + " " + quiz_color[2].toString(16);
    document.querySelector("#rndColor").textContent = new_text;
    if(show){
        colorBox(0,quiz_color[0],quiz_color[1],quiz_color[2]);
    }
}
|
The “colorBox” function simply set the color of the boxes:
1
2
3
|
function colorBox(n,r,g,b){
    document.querySelectorAll(".colorBox")[n].style.backgroundColor = "rgb(" + r + ", " + g + ", " + b + ")";
}
|
Then I added the event listener to the 2 button:
 1
 2
 3
 4
 5
 6
 7
 8
 9
10
11
12
13
14
15
16
17
18
|
done_btn.addEventListener("click", function(){
    var value_r = document.querySelectorAll(".bar")[0].querySelector("input").value / 100 *255;
    var value_g = document.querySelectorAll(".bar")[1].querySelector("input").value / 100 *255;
    var value_b = document.querySelectorAll(".bar")[2].querySelector("input").value / 100 *255;
    user_color = [value_r,value_g,value_b];
    colorBox(1,value_r,value_g,value_b);
    colorDifference();
    disableButton(false);
});

reset_btn.addEventListener("click", function(){
    colorBox(0,255,255,255);
    colorBox(1,255,255,255);
    genColor();
    updateText(false);
    document.querySelector("#accText").textContent = "";
    disableButton(true);
});
|
The first one is the Done button, it display the result of the combination of the 3 bars, then it call the colorDifference function and disable itself as it will be replaced by the new color! button, this one simply make the game restart.
The “colorDifference” function is where I calculated the average differences( in %) between the player’s color and the correct color:
1
2
3
4
5
6
7
|
function colorDifference(){

    var result = Math.abs((user_color[0]/255)-(quiz_color[0]/255)) + Math.abs((user_color[1]/255)-(quiz_color[1]/255)) + Math.abs((user_color[2]/255)-(quiz_color[2]/255));
    result = 100-(result/3*100);
    document.querySelector("#accText").textContent = "Accuracy: " + result.toFixed(2) + " %";
    updateText(true);
}
|
What it does is pretty simple, it take the user color and the correct color, then instead of having a value that can be from “0” to “255” it make these values(for every channel) go between “0” and “1”, then I subtract to get the difference.
After that it sum the difference of each channel, and finally calculate the average, then calculate the % of the value.
The last part is only used to avoid to have both buttons enabled at the same time:
 1
 2
 3
 4
 5
 6
 7
 8
 9
10
|
function disableButton(inverse){
    if(!inverse){
        done_btn.style.display = "none";
        reset_btn.style.display = "block";
    }
    else{
        done_btn.style.display = "block";
        reset_btn.style.display = "none";
    }
}
|
Conclusion
Even if it’s just a simple game I’m very satisfied of what I achieved.
What do you think about it?
Did you find this post interesting?
Comment on Twitter! @CodeSailer